These notes are designed to assist in the construction of the
Firecrest series of kites. Please note that they are aimed primarily at
the Mark 1 Firecrests. There are some subtle differences with Mark 2
Firecrests. The construction gallery shows Mark 2 Firecrest in the main
so you should look there too to ensure you get it right. If you still
have problems, send me a mail and I will help as best I can.
I will create a full set of notes for the Mark 2 Firecrests as soon as I
can.
WARNING: I am left-handed so suggestions I make here may not be quite
right for a right-hander. I would suggest a test on each of the stages
before proceeding with the whole job.
The kite should be stitched together with quite long stitches using polyester or nylon thread. Ideally, the thread should be between no. 40 and no. 80 thread although no. 60 seems to be the best. If using a thick thread, make the stitches longer than if using thin thread. (e.g. if using no. 40, use 6 stitches/inch and if using no. 80 or standard Gutermann thread, use 8-10 stitches/inch). The stitch tension should be quite high to ensure the seams are airtight. Run several test pieces to get the correct thread tension, particularly if using thick thread. Work as accurately as you can on all stitching, otherwise minor errors can add up to cause a major variation on the kite. Ensure that you are attentive to the start and end of a row of stitching. It is essential that you backstitch at both ends.

Rib preparation involves reinforcing the vent holes, adding bridle attachments and hemming the leading edge/vent openings. The ribs have various markings on them, such as the position of the bridle attachment reinforcement and the position of the leading-edge vent opening. The length of each of the ribs is also marked on them to aid identification. Most markings are on the seam allowance.
Cut strips of ripstop repair tape 12mm wide x 60mm long (cut 4 long strips of ripstop tape each 12mm wide, then cut 60mm long strips off those). Stick one piece to each side of each hole, oriented vertically, close to the edge of the hole. Each piece should be fixed into place with a zigzag stitch close to the edge nearest the hole for maximum strength although this is not necessary if using good quality sticky-ripstop with high strength adhesive. This helps to minimize the risk of the ribs tearing in a power dive.
 |
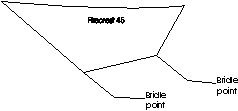
The flares at the sides of the kite should be edged with 20mm wide ribbon or centre-fold tape on the three outside edges (bottom edges, as shown in the drawing). In addition, the two bridle points should have tapes or Dacron cord stitched on for bridle attachment. You should then stitch the flares to the tip ribs. Be sure to make a left and right set. If you do not have suitable ribbon or tape, simply hem the edges of the flares and stitch some Dacron cord along the edges to prevent the fabric from stretching (the supplied pieces have hem allowance but if binding with ribbon, trim the hem allowance off first). |
Preparation of the top skins involves assembling the centre panels
and hemming the leading edges (if making a buggy kite).
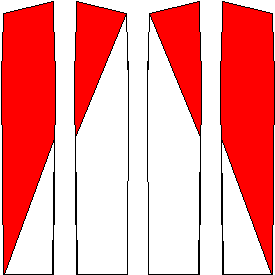
The centre four skins should be prepared first. Each of those is in two
pieces that must be stitched together to produce the triangle in the
centre of the kite. See below. The seam should be turned towards the
dark fabric.
 |
OPEN CELL KITE ONLY: The leading edge of the top skins should be hemmed, preferably with 10mm ribbon stitched on top of the hem for additional strength and stiffness. The ribbon should end up inside the kite for a better look. If you look at a Predator, you will see that the seams of the top skins and the ribs are turned inside. i.e. the ribs and skins are stitched together in a single seam. Examining a Flexifoil will reveal that the top skins are stitched together first and the ribs are then stitched on top of the seam folded over to one side. In this case, the stitching goes onto several layers of fabric, giving additional strength. Both approaches are equally valid. I prefer to stitch the skins and ribs in a single seam. In this way, the stitching is not exposed to the abrasive effects of sand, but the Flexifoil method is probably easier, at the expense of more stitching. If you should decide to make the top skins into a single piece, it is probably better to hem the leading edges after joining the skins together. |
The table of bridle lengths does not include allowance for the knots
and loops. Allow 100mm for knotting (the excess can be trimmed off and
melted with a lighter flame once the bridling is complete or you can use
a knotless loop if your bridle cord will support it). Mark the correct
length on each line with a permanent marker. Bridle lines are labelled
A, B and C. A is closest to the leading edge, C furthest back. The
fourth set is the control lines.
Cut the lines to within a few millimetres of the dimensions given. Make
up the lines in pairs, starting at number 2. Attach the bridles to the
kite by stitching the bridle line through the bottom skin of the kite
with a stout needle and around the bridle reinforcement.
 |
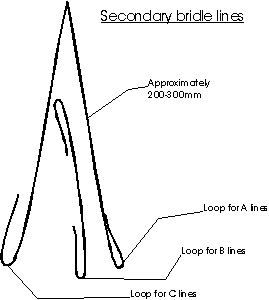
Each set of lines (A, B and C) should be gathered together and attached to a single point. The loops of the secondary bridling should be stitched rather than knotted as this will result in a stronger and neater finish. Make the loops for the A and B set first. Initially, you should knot the loop for the C set, until the bridling is finally tuned. The length of the secondary bridle lines is not critical. See the construction gallery for detailed photos of how to finish the secondary lines. |
The bridle line lengths shown will give you a kite that will fly but is likely to need fine-tuning. This is accomplished by lengthening or shortening the A lines. If the kite rises up fast but then over-flies and collapses, lengthen the A lines by about 5mm. This will result in a shortening of the C lines by 5mm. If the kite is slow to inflate and prone to stall, shorten the A Lines slightly (about 3-4mm). You may also notice a crease along the bottom skin of the kite between the A and B lines. If this occurs, lengthen both the A and C lines by about 10mm to start with and repeat the tuning process. Once the tuning is complete, stitch the C Line loops closed.
The Construction Notes page has been visited times